I want to preface this with the comment that planning like this really depends on what you have around in your locality. Many years ago I lived in York, a city stuffed with historical buildings. A visit to one of those would give an entirely different flavour to my ideas.
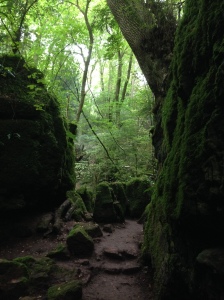
I went on a family walk to a local wood, and it got me thinking about how the local environment, the places of interest, both environmentally and historically, could be used to bring immediacy, and an exciting reality into your classroom. A local wood lends itself to particular areas of the curriculum (there is little point stretching connections for the sake of an all encompassing topic, and some subjects, most notably elements of the English and Mathematics curriculum need to be taught discretely), so this post demonstrates how I would plan for an upper junior class, using the wood as inspiration.
The first place to start when planning any unit of work for your class is from what the children need to know, and the National Curriculum is the place to look.
Leaving aside the detail of the English programme of study, I would choose a class story, one that is above the ability of the majority of children to read for themselves, that connects in some way to the theme I have chosen. For this, and partly because the author spent many hours in the area, walking in this wood while he composed his stories, I would choose ‘The Hobbit’. I might choose to use passages from this book to study, to check for comprehension, and to use as a starting point for discussion as to why the characters behave as they do. Before reading this book to a class I would always recommend a teacher reading it themselves. You might decide, due to the composition of your class, that your chosen book isn’t quite right, and, for a book as long and complicated as ‘The Hobbit’ it is worth considering whether or not to use an abridged version.
There are plenty of ways in which you can use a class story as a stimulus for writing, so I will save those for another post, needless to say there is plenty of scope for diary extracts, letters home, songs, guides for keeping dragons, non-fiction accounts of hobbit holes; the list is almost endless.
The wood itself, though, can give plenty of scope for creativity. Who might have lived in the wood? Could you use the visit as a starting or end point for some imaginative story making? What about poetry? The anthology ‘Sensational’, a collection of poems based around the five senses could be a stimulus. What did your class see, hear, smell, taste and feel when they went on the visit? What kind of senses poem would they write?
Mathematics is a subject that I feel is best taught as a stand alone, but that doesn’t mean that we shouldn’t look for opportunities to use it in real life contexts. How big is the wood? How could your class go about estimating and measuring its area? There is plenty of scope for data collection; types of tree, number of visitors, size of tree trunk, for instance. For some children, a discussion on how to work out the height of particular trees would be a meaningful challenge, especially if they were acting out the parts of woodcutters (this would need to fit in with your chosen story, if you wanted to give the activity a context).
In Science, the children need to learn to work scientifically by:
* planning different types of scientific enquiries to answer questions, including
recognising and controlling variables where necessary
* taking measurements, using a range of scientific equipment, with increasing
accuracy and precision, taking repeat readings when appropriate
* recording data and results of increasing complexity using scientific diagrams and
labels, classification keys, tables, scatter graphs, bar and line graphs
* using test results to make predictions to set up further comparative and fair tests
* reporting and presenting findings from enquiries, including conclusions, causal
relationships and explanations of and degree of trust in results, in oral and written
forms such as displays and other presentations
* identifying scientific evidence that has been used to support or refute ideas or
arguments. (National Curriculum, 2014)
In order to do this, the children will need to have formulated some scientific questions they can begin to answer through a visit to a wood. Examples of questions might be: which animals and plants live in which parts of the wood? What is the temperature like in different parts of the wood? What is the habitat of the wood like compared to the countryside around and about it, or, indeed, in the school? How do the two habitats compare? The questions will then need refining until they are the sort that the children can plan to investigate, with appropriate measuring equipment, keys and identification resources.
If you plan on doing some sort of investigation into the living things in the wood, then research into woodland habitats and what might be found there at different times of the year is essential. When the children have completed their investigation, then they will need to present their results, giving an excellent opportunity for writing in another curriculum area.
In Year 5, under the heading ‘Living things and their habitats’, the children should be taught to:
* describe the differences in the life cycles of a mammal, an amphibian, an insect and
a bird
* describe the life process of reproduction in some plants and animals. (National Curriculum 2014)
In Year 6, the children should be taught to:
* describe how living things are classified into broad groups according to common
observable characteristics and based on similarities and differences, including microorganisms, plants and animals.
* give reasons for classifying plants and animals based on specific characteristics. (National Curriculum 2014)
A visit to any environment gives you the chance to examine the state of the plants at whatever season you are in, but, if you are studying seeds, then time your visit for the autumn, flowers, late spring. Do your homework, and find out when the best time to visit is, depending on what aspect you are studying. My wood has no water running through, or in it (unless you count the rain), so, for a study of amphibians you might want to visit somewhere else (you never know, your school might have a pond); this would be an excellent habitat to study for a contrast. Before you visit, the children could make their own classification keys, which they then use on the site. A discussion of/investigation into adaptation, in the context of looking at different habitats, is also relevant here.
My own personal preferences lie along the artistic/creative side of a curriculum, and the programme of study for Art certainly gives teachers plenty of room for manouvre. Children are required:
* to create sketch books to record their observations and use them to review and revisit
ideas
* to improve their mastery of art and design techniques, including drawing, painting and
sculpture with a range of materials [for example, pencil, charcoal, paint, clay]
* about great artists, architects and designers in history. (National Curriculum 2014)
No visit is ever complete without an opportunity to sketch. The children could make sketches, along with rubbings, collect leaves and take photographs, all of which could be gathered together in their sketchbooks. In lessons past I have enjoyed sketching in pencil, charcoal, pastels and watercolours, so it really depends how much kit and caboodle you wish to carry. Pencil is perfect for sketching in the outdoors; back in the classroom, you can choose, according to where you are in a teaching sequence of art media.
The wood in my visit has a wonderful rich, clay soil that gleams wetly no matter what the weather conditions seem to be, and gives me lots of inspiration for work in clay. Could the children make columns like tree trunks and then give them texture like their rubbings? Could they make twisted shapes like the exposed roots we saw? In the past, I have given children free reign on how they wanted to respond in clay, but you might have other ideas. You might want to explore other ways of 3D modelling; tin foil, for example. (Re-reading this makes me wonder how I could incorporate creative dance into the project.)
The artistic impact of the illustrations for ‘The Hobbit’ and the following ‘Lord of the Rings’books is worth investigating, especially given my wood’s historical connection with the author; could the children use their sketches to inform a fantasy painting? The work of Andy Goldsworthy is also interesting and relevant. Could the children use natural materials in the wood itself to make a transient artwork they then photograph? The hard bit, really, is the choosing.
The Geography curriculum require children to:
describe and understand key aspects of:
* physical geography, including: climate zones, biomes and vegetation belts, rivers,
mountains, volcanoes and earthquakes, and the water cycle
* human geography, including: types of settlement and land use, economic activity
including trade links, and the distribution of natural resources including energy,
food, minerals and water
Geographical skills and fieldwork
* use maps, atlases, globes and digital/computer mapping to locate countries and
describe features studied
* use the eight points of a compass, four and six-figure grid references, symbols and key
(including the use of Ordnance Survey maps) to build their knowledge of the United
Kingdom and the wider world
* use fieldwork to observe, measure, record and present the human and physical features in the local area using a range of methods, including sketch maps, plans and
graphs, and digital technologies. (National Curriculum 2014)
Where is the wood to be found on a map of the UK? What human and physical features are nearby? Can the children plan a route around the wood, or, use a compass to help them find their way out? Can the children make sketch maps, leading to plans, with coordinates, symbols and keys? Depending on where you want your focus of the visit to be would dictate at what part of your teaching sequence you would make your visit.
As far as History is concerned, I would plump for the local history part of the curriculum for this wood, but really, it does depend on your locality, your visit. What has happened near to where you live? Whatever it is, you will need to do a bit of research. A quick bit of googling reveals that my wood was the site of mining for iron ore from the iron to the Roman age. Plenty of scope there for a few trips to the library for more detailed information and primary sources to use with children.
In Music Pupils should be taught to:
* play and perform in solo and ensemble contexts, using their voices and playing musical
instruments with increasing accuracy, fluency, control and expression
* improvise and compose music for a range of purposes using the inter-related
dimensions of music
* listen with attention to detail and recall sounds with increasing aural memory
* use and understand staff and other musical notations
* appreciate and understand a wide range of high-quality live and recorded music drawn
from different traditions and from great composers and musicians
* develop an understanding of the history of music. (National Curriculum 2014)
I would use the visit as a starting point for a composition. Could we use classroom percussion to evoke a sense of the wood, the sounds we heard when we were there (we might make a recording during our visit). Could we ‘play a picture’? (There are lots of ways to do this.) Could we devise some rhythms based on words from the wood? Could we tell a story in sound? If we wrote stories based around our visit, could we use them? Can the children use notation, either graphic or staff, to record their compositions? Are there any songs or rounds based on woodland life? Could you use some of the music from the film of the Hobbit or the Lord of the Rings that is used during the woodland scenes to discuss how the composer creates the desired effect?
This represents a flavour of the kind of classroom activities I would plan based around a visit to a wood. What do you have nearby that you could use?
And congratulations for getting to the end.

